


How to evade NSA and CIA surveillance? Basic anonymity techniques for Black Hats.


CAUTION: The title is solely for grabbing attention.
Anonymity is crucial for circumventing authoritarian laws in your country and enhancing cybersecurity and operational security processes.
Understanding that anonymity isn't solely for nefarious purposes but serves as a means to safeguard data and privacy is paramount. However, without further ado, let's delve into the essence of the matter.
Originally intended as a 40-minute read, I've condensed the content. It will likely be split into two parts: one focusing on theory and the other on practical application.
The Onion Router
The Tor Network, short for "The Onion Router," is designed to safeguard user privacy and anonymity on the internet. Its primary objective is to shield users from online surveillance by concealing their online activities and physical whereabouts.
Tor functions through a network of servers known as "nodes" or "relays," which transmit data between each other. When a user accesses the Tor network, their internet traffic is encrypted and routed through multiple random nodes before reaching its intended destination. Each node in the chain only knows about the previous and next nodes, ensuring that neither the origin nor the final destination of the data is revealed.
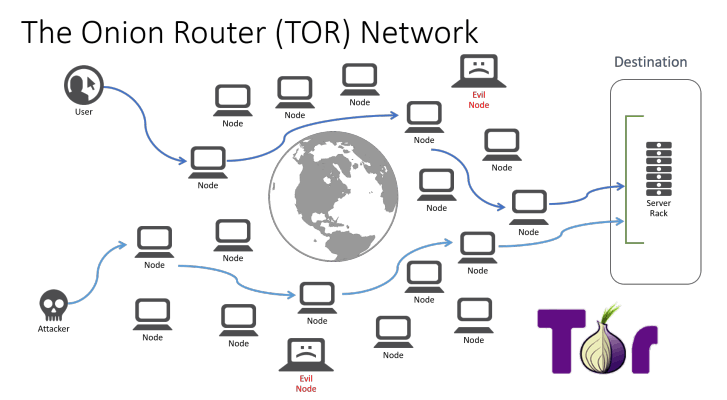
Here's a simplified breakdown of how Tor works:
Encryption: When you use Tor, your internet traffic is encrypted, meaning it's scrambled so that only authorized parties can understand it.
Routing through Nodes: Your encrypted data is then routed through a series of random nodes or relays, each of which only knows about the previous and next nodes in the chain.
Anonymous Transmission: At each node, a layer of encryption is peeled off, revealing the location of the next node, but hiding the original source and final destination of the data.
Final Destination: Eventually, your data reaches its final destination, but to an outside observer, it appears to have come from a random node in the Tor network, providing anonymity and privacy.
Browser security settings
Standard
- At this level, all Tor Browser and website features are enabled.
Safer
This level disables website features that are often dangerous. This may cause some sites to lose functionality.
JavaScript is disabled on all non-HTTPS sites; some fonts and math symbols are disabled; audio and video (HTML5 media) are click-to-play.
Safest
This level only allows website features required for static sites and basic services. These changes affect images, media, and scripts.
Javascript is disabled by default on all sites; some fonts, icons, math symbols, and images are disabled; audio and video (HTML5 media) are click-to-play.
Installing on Linux
If you don't already have it, you can install it using your system's package manager. For example, on Ubuntu, you can install Tor with the following command:
kali > sudo apt-get install tor
Here are some examples of options you can set in the torrc file:
SOCKSPort: This option sets the port on which Tor accepts connections. The default value is 9050. You can change it as per your requirement.
For example:
SOCKSPort 9050
Log: This option sets the log level and log file. For example, to log warning level information to the /var/log/tor/notices.log file, you could use:
Log notice file /var/log/tor/notices.log
ExitNodes: This option can be used to specify the exit nodes you want to use. For example, to use US-only exit nodes, you can use:
ExitNodes {US}
StrictNodes: If you set this option to 1, Tor will strictly respect your ExitNodes, ExcludeNodes, etc. For example:
StrictNodes 1
After making your changes, save the file and restart the Tor service for the changes to take effect. On Ubuntu, you can restart Tor with the following command:
kali > sudo service tor restart
tb-manual.torproject.org/running-tor-browserwired.co.uk/article/what-is-the-dark-web-ho..
Mr. Robot Attacks
ChatGPT Info
The episode doesn't delve into the specific attack or technical intricacies, but we can speculate on how Elliot might have executed it based on common hacking and cybersecurity practices.
Notably, the Tor network ensures user and server anonymity for hidden websites by routing traffic through intermediary servers called "nodes." However, misconfigurations in hidden sites can potentially expose their original server.
Here's a hypothetical method Elliot could have used:
Server Discovery: Elliot might have discerned that the site was hosted on a regular server rather than a hidden one by monitoring network traffic. Techniques like traffic analysis or packet inspection could have been employed for this purpose.
Exploiting Vulnerabilities: Armed with the server's location, Elliot could have exploited software vulnerabilities to gain access. For instance, a command injection attack could have been deployed by injecting malicious commands into a poorly secured user interface or API.
Evidence Acquisition: Once inside the server, Elliot could have retrieved the evidence files from the site operator.
This scenario is purely speculative and doesn't detail Elliot's exact methods. Moreover, engaging in hacking activities is illegal and carries severe repercussions.
tor.stackexchange.com/questions/8636/is-the..reddit.com/r/MrRobot/comments/8w9rfg/confus..news.mit.edu/2015/tor-vulnerability-0729
Proxy
A proxy server serves as a middleman between a user and the internet. When you connect to the internet through a proxy, your requests are first sent to the proxy server. Then, the proxy server communicates with the internet on your behalf.
For instance:
A proxy server acts as an intermediary between you (the client) and the internet. Here's how it works:
You request to visit a website, such as www.example.com.
Your request is sent to the proxy server.
The proxy server connects to www.example.com and fetches the content.
www.example.com sends the content back to the proxy server.
The proxy server forwards the content to you.
Proxy servers serve various purposes, including enhancing privacy (by hiding your IP address), boosting performance (by caching web pages), or bypassing access restrictions to specific websites.
One common type of proxy is the SOCKS proxy, capable of handling different types of internet traffic like email, chat, or FTP.
To configure a client to use a SOCKS proxy:
Access your client's network or internet settings.
Look for an option to configure a proxy or SOCKS proxy.
Input the SOCKS proxy server's IP address and port.
Save the settings and restart the client if required.
For instance, configuring Firefox to use a SOCKS proxy involves:
Go to Firefox's Preferences.
Navigate to the "Network Settings" section.
Choose "Manual proxy configuration."
Enter the IP address and port of the SOCKS proxy server.
Select "SOCKS v5" unless SOCKS v4 is required.
Save the settings.
Remember, while proxies can enhance privacy, they're not as secure as VPNs or Tor, which encrypt all internet traffic. Proxies only protect the requests sent through them, and the proxy server operator can see the traffic passing through it.
On Linux, you can set environment variables for a proxy server, which most internet-connected programs will use.
Here are the steps to configure a proxy server using the terminal:
export http_proxy=http://[username]:[password]@[proxy]:[port]
Replace [username], [password], [proxy], and [port] with the details of your proxy server. If the proxy server doesn't require authentication, you can omit the [username]:[password]@ part.
For an HTTPS proxy server, set the https_proxy variable.
export https_proxy=https://[username]:[password]@[proxy]:[port]
To verify that the variable has been set correctly, you can use the echo command. For example:
echo $http_proxy
This should show your proxy server address.
These settings are temporary and will be lost when you close the terminal. To make them permanent, you can add export commands to the shell's startup file (such as .bashrc or .bash_profile), which is run every time you open a new terminal.
To set up a SOCKS proxy, the process is a little different and depends on the specific program you are using. Many programs have their own SOCKS proxy settings that you need to configure separately.
Example:
To use Nmap over the Tor network and a SOCKS proxy, you will need a utility called proxychains. Proxychains is a program that forces any TCP connection to go through a proxy. It can be used to forward Nmap traffic over Tor.
Here are the general steps for configuring and using Nmap with Tor and Proxychains:
Install Tor and Proxychains: Depending on your Linux distribution, you can use the package manager for this.
On Ubuntu, you can use apt:
sudo apt-get install tor proxychains
Configure Proxychains: The Proxychains configuration file is typically found at /etc/proxychains.conf. Ensure this file is set up to utilize Tor by adding a line at the end stating socks4 127.0.0.1 9050. This directive instructs Proxychains to route traffic through Tor, which typically runs on IP address 127.0.0.1 and port 9050.
Start Tor: Initiate Tor by executing tor in a terminal. On certain distributions, starting Tor as a service might be necessary, such as systemctl start tor or service tor start.
Using Nmap with Proxychains: With Proxychains configured, you can utilize Nmap. Simply prepend the nmap command with proxychains. For example:
proxychains nmap -sT -PN -n -sV -p 80 www.example.com
Whonix is a Debian-based Linux distribution focused on providing internet privacy, security, and anonymity. It achieves this by exclusively routing all internet connections through the Tor network and segregating various tasks into distinct virtual machines to prevent IP leaks and other deanonymization methods.
The Whonix configuration comprises two components: the Workstation and the Gateway. The Workstation serves as the primary environment for user activities like web browsing and emailing. Meanwhile, the Gateway handles Tor network connections and routes all Workstation traffic through it.
Here are some helpful tips and tricks for utilizing Whonix:
- Regular updates: Whonix is based on Debian, so you can use apt-get to keep your system up to date. It is recommended to do this regularly to ensure you have the latest security patches.
2. Using Tor Browser: Whonix comes with Tor Browser, which is a modified web browser to protect your privacy and anonymity. It is recommended to use Tor Browser for all web browsing activities.
3. Task isolation: One of the key features of Whonix is task isolation. This means you can use different Workstations for different tasks to avoid correlation of activities. For example, you can use one Workstation to browse the web and another to send e-mails.
4. Be careful what you share: Remember that while Whonix can protect your anonymity, it cannot protect you from sharing personal information. Be careful when sharing information that could be used to identify you.
5. Using VPNs or Proxies with Whonix: While it is possible to use a VPN or proxy with Whonix, it is generally not recommended. The Tor network already provides anonymity, and using a VPN or proxy can introduce additional vulnerabilities.
6. Malware protection: Like any system, Whonix can be vulnerable to malware. Therefore, it is important to practice good security habits, such as not downloading files from unknown or untrusted sources.
7. Reading the Documentation: The Whonix documentation is extensive and covers many topics related to internet privacy and security. We highly recommend reading it to better understand how Whonix and the Tor network work.
Install and Configurate using KVM
Connect to Host via SSH with tunneled ports:
ssh $USER@$HOST -L 5910:localhost:5910 -L 5911:localhost:5911
Whonix Gateway
- Download & Extract Whonix Gateway:
cd /var/lib/libvirt/images
wget https://www.whonix.org/download/13.0.0.1.1/Whonix-Gateway-13.0.0.1.1.libvirt.xz
tar -xvf Whonix-Gateway*.libvirt.xz
Create Network:
virsh define Whonix-Gateway*.xml
sed -i 's/virbr1/whonixbr1/g' Whonix_network-*.xml
virsh net-define Whonix_network*.xml
virsh net-autostart Whonix
virsh net-start Whonix
Configure & Start Whonix VM:
virt-xml Whonix-Gateway --remove-device --graphics
virt-xml Whonix-Gateway --edit --graphics 'vnc,password=test,port=5910,keymap=de'
virsh start Whonix-Gateway
Connect VNC to 127.0.0.1:9510 & Finish Whonix Wizard.
Kali
- Create Disk Image:
qemu-img create -f qcow2 /var/lib/libvirt/images/kali.qcow2 32G
Download & Modify Preseed File:
wget -O preseed.cfg https://raw.githubusercontent.com/offensive-security/kali-linux-preseed/master/kali-linux-light-unattended.preseed
sed -i 's/\/dev\/sda/\/dev\/vda/g' preseed.cfg
Install Kali Linux:
virt-install --name kali \
  --ram 2048 \
  --disk "bus=virtio,path=/var/lib/libvirt/images/kali.qcow2,format=qcow2" \
  --vcpus 2 \
  --accelerate \
  --os-type "linux" \
  --noautoconsole \
  --network "bridge=virbr0" \
  --location "http://http.kali.org/kali/dists/sana/main/installer-amd64/" \
  --graphics "vnc,port=5911,password=secret,keymap=de" \
  --initrd-inject "preseed.cfg" \
  --extra-args "keymap=de"
Start Kali:
virsh start kali
Connect VNC to 127.0.0.1:9511 & Login with root:toor
Install Kali Packages:
apt-get install kali-linux-full
Change Network to the Whonix Gateway's internal Network:
virsh detach-interface kali --type bridge
virsh attach-interface kali --type=bridge --source=whonixbr1
Configure Kali Network:
IP: IP
Netmask: 255.255.192.0
Gateway: 10.152.152.10
Nameserver: 10.152.152.10
Reboot:
virsh destroy kali
virsh start kali
Tails, short for The Amnesic Incognito Live System, is a Debian-based Linux OS aimed at ensuring privacy and anonymity. Like Whonix, Tails employs the Tor network to anonymize all internet connections.
Tails operates as a live system, running from removable media such as DVDs or USB sticks without needing installation on a hard drive. Notably, it leaves no traces on the host computer, refraining from utilizing its hard drive or memory unless specifically instructed.
To configure Tails:
Download Tails: Obtain the latest Tails ISO image from the official website.
Create bootable media: Use tools like Etcher or Rufus to create a bootable USB stick or burn the ISO image to a DVD.
Launch Tails: Boot your computer from the Tails USB stick or DVD, possibly adjusting the boot order in your BIOS or UEFI settings.
Configure Tails: Upon first launch, follow the setup process, including language and keyboard settings, and setting an administrator password. Optionally, create "Persistent Storage," an encrypted section on the USB stick for storing files across Tails sessions.
Use Tails: With setup complete, utilize Tails, which comes with pre-installed applications for web browsing, email, document editing, etc. All programs are configured to utilize the Tor network and uphold your privacy.
Tails has a rich history of usage across various contexts:
Human Rights Activism: In regions with oppressive governments, activists rely on Tails for secure communication and access to restricted information, shielding themselves from government surveillance.
Investigative Journalism: Journalists handling sensitive data or collaborating with confidential sources turn to Tails to safeguard their communications and work. Notably, Tails was utilized by journalists reporting on Edward Snowden's NSA revelations in 2013.
Surveillance Evasion: Individuals concerned about privacy infringement from governmental or corporate entities find refuge in Tails. As awareness of privacy issues grows, more people opt for tools like Tails to safeguard their personal data.
Cybersecurity Research: Security professionals and IT experts leverage Tails for various purposes, such as analyzing malware or conducting security investigations. By using Tails, they prevent contamination of their primary systems, ensuring the integrity of their work.
Tails, as a privacy and security-focused operating system, serves as a crucial tool for individuals and organizations operating in sensitive environments or confronting formidable adversaries like governments and corporations.
Here are some resources discussing Tails and its applications:
Additionally, let's briefly touch on Virtual Private Networks (VPNs):
VPN (Virtual Private Network) is a technology that establishes a secure connection between two devices on a network, commonly over the internet. With a VPN, all data traffic is encrypted and routed through a virtual "tunnel," safeguarding your information from interception or observation by others.
VPNs serve multiple purposes:
Privacy: By masking your real IP address and routing your internet traffic through a VPN server, VPNs help safeguard your online privacy.
Security: VPNs encrypt all your internet traffic, protecting you from eavesdropping, especially on public Wi-Fi networks where "man-in-the-middle" attacks are prevalent.
Avoiding Censorship and Geo-blocking: VPNs enable access to content blocked by geographic location or government censorship by making it appear as if you're browsing from a different location.
OVPN is a file format used by OpenVPN, an open-source VPN software. An .ovpn file comprises all the necessary information to connect to a VPN, including server address and encryption keys.
To use an .ovpn file, you typically require a VPN client supporting OpenVPN, like the OpenVPN client itself. Importing the .ovpn file into the client allows it to establish a connection to the VPN using the provided information.
Tor + VPN?
Yes, it is technically possible to use a VPN in conjunction with the Tor network, but how effective this combination is depends very much on what you are trying to achieve and the specific threat model you are facing. Here are two common configurations:
VPN over Tor: In this setup, you connect first to the Tor network and then to your VPN. This can be useful if you want to access services that block connections from the Tor network, as the traffic will appear as coming from the VPN and not Tor. However, this means that the VPN provider can see your real internet traffic, which may not be ideal from a privacy point of view.
Keep in mind that both configurations have pros and cons, and neither is a perfect solution for all scenarios. Also, using a VPN with Tor can significantly slow down your connection.
Configuring you VPN
github.com/KhetaguriDimitri/TORvpn
VPN providers: There are many providers that offer server infrastructure for you to set up your own VPN. Some of the most popular ones include DigitalOcean, Linode, and Amazon Web Services (AWS). These providers provide a wide range of options to choose from depending on your budget and infrastructure needs.
Proxy Sources: There are several sources of proxies, both free and paid. However, free proxies may not be as secure or reliable as paid ones. Some reliable paid proxy providers include ProxyRack, Oxylabs and Smartproxy.
Starting a VPN Service: If you are thinking about starting your own VPN service, here are some things to consider:
Technical knowledge: You need to have a good understanding of networking and security.
Legality: Ensure that you comply with all local and international laws and regulations.
Security: Use strong encryption protocols to protect users' privacy and data.
Transparency: Be transparent about your policies, especially with regard to the retention and handling of user data.
4. Ensuring Users' Security and Privacy: Here are some ways to ensure users' security and privacy on a VPN service:
Use strong encryption: This will ensure that data transmitted over the VPN is secure.
Implement a no-logs policy: This means that you do not log any information about users' VPN usage.
Keep your servers secure: This includes keeping all your software up to date and patching any security vulnerabilities that may arise.
Provide two-factor authentication (2FA): This will add an extra layer of security by preventing unauthorized access.
Keep in mind that operating a VPN service can be a technical and legal challenge. It is important to research and understand all the implications before proceeding.
VPN Solutions:
Mullvad VPN
Mysterium VPN (Best)
"The main detail to be looked at in the VPN is how the activity logs are stored."
"Wireguard or OpenVPN?"
"Double-Connection or VPN Chaining?"
Torbox
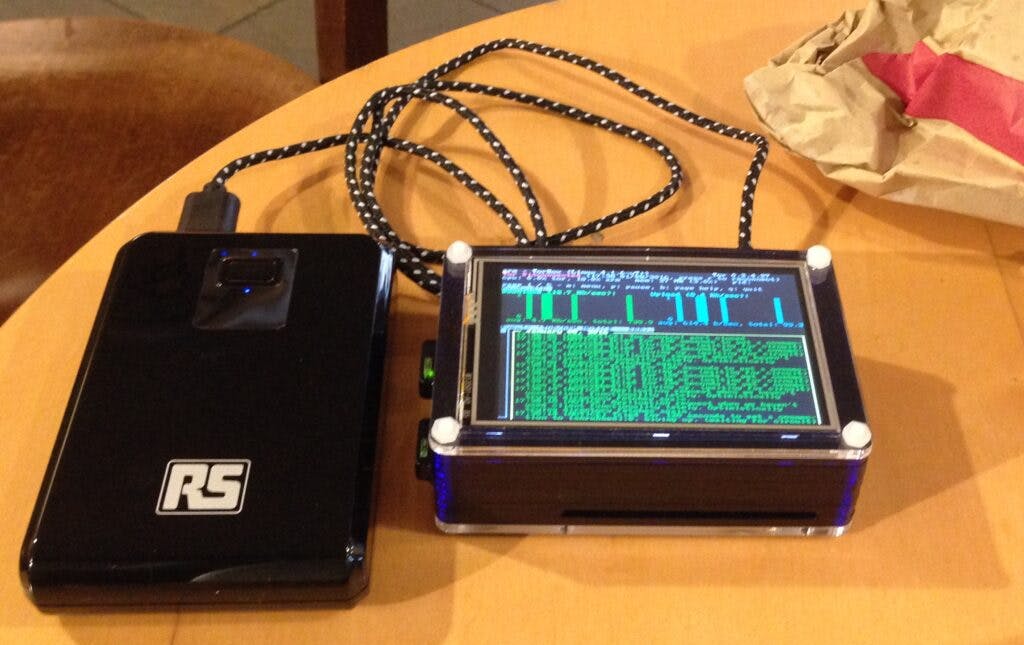
What’s this all about?
TorBox is an easy to use, anonymizing router based on a Raspberry Pi. TorBox creates a separate WiFi that routes the encrypted network data over the Tor network. Additionally, TorBox helps to publish data easily and safely through Onion Services. The type of client (desktop, laptop, tablet, mobile, etc.) and operating system on the client don’t matter.
Tor, on which TorBox is based, encrypts your network data from your client to the Tor exit node, overcomes censorship, and anonymizes your data stream. Commonly, Tor is used by the Tor Browser, which facilitates surfing the web or accessing onion services (.onion – Websites). However, there are also other programs using Tor, like the peer-to-peer messenger app Ricochet Refresh, TorBirdy (an extension for Mozilla Thunderbird) and OnionShare. Though wouldn’t it convenient to route all your data through the Tor network, independently from the client, the service, and the program be used?
TorBox accomplishes this by creating a separate WiFi and routing all network data over the Tor network. Also, clients can be connected to a TorBox using an Ethernet cable. The TorBox image file, available here (~1.1 GB), can be run on a low-priced Raspberry Pi.
TorBox can be connected to an Internet router through an Ethernet cable, but it can also be used in connection with another (unsecured) WiFi, even if it has a captive portal.
VPS (Virtual Private Server)
VPS is the acronym for Virtual Private Server, or Virtual Private Server. It is a type of web hosting service that provides users with a dedicated server environment on one machine that is shared by multiple users. This is accomplished through the use of virtualization technology, which divides a physical server into several separate virtual "machines".How to set up a VPS:
Choose a VPS Provider: There are many VPS providers available such as DigitalOcean, Linode, AWS, Google Cloud, etc. The choice of provider can depend on many factors such as cost, performance, customer support, server location and others.
Select the right package: VPS providers often offer multiple packages with different resource levels (CPU, memory, storage). Select the package that best suits your needs.
Configure the VPS: After purchase, you will have to configure the VPS. This may involve installing the operating system, configuring the web server (eg Apache, Nginx), installing the database (eg MySQL, PostgreSQL) and installing any other necessary software.
Manage the VPS: Once the VPS is set up, you will need to manage it regularly. This may include maintaining the software (eg updates), monitoring performance and responding to any issues that may arise.
A Virtual Private Server (VPS) offers numerous benefits, making it a popular choice for individuals and businesses alike. Here are some key advantages:
Cost-Effective: VPS hosting is typically more affordable than dedicated hosting, making it a cost-effective solution for those who need more resources than shared hosting but don't want the expense of a dedicated server.
Scalability: VPS hosting allows for easy scalability. As your website or application grows, you can easily upgrade your VPS plan to accommodate increased traffic and resource demands.
Control and Customization: With a VPS, you have full root access to your server, giving you complete control over its configuration and allowing for customization to suit your specific needs. This level of control is not typically available with shared hosting.
Improved Performance: Since you have dedicated resources on a VPS, you don't have to compete with other users for server resources, leading to better performance and reliability for your website or application.
Enhanced Security: VPS hosting offers a higher level of security compared to shared hosting. Since each VPS is isolated from others on the same physical server, the risk of security breaches due to neighboring websites or applications is minimized.
Reliability: VPS hosting providers often guarantee a certain level of uptime, ensuring that your website or application remains accessible to users. Additionally, since you have dedicated resources, performance issues on other VPS instances won't affect yours.
Flexibility: VPS hosting allows you to choose the operating system and software configurations that best suit your needs. Whether you're running a Linux or Windows environment, you have the flexibility to customize your server setup accordingly.
Backup and Disaster Recovery: Many VPS hosting providers offer backup and disaster recovery solutions, helping you protect your data and quickly recover in the event of a hardware failure or other unforeseen issues.
Overall, VPS hosting offers a balance of performance, control, and affordability, making it an attractive option for individuals and businesses looking for a reliable hosting solution.
The Best VPS Providers i Recommend:
Sock Puppet
The term "sock puppet" is used to refer to a false or alternate online identity created by a person or organization. Typically, sock puppets are used to influence online discussions, manipulate public opinion, or spread misinformation. In some cases, they can also be used for spying or intelligence gathering purposes.
In the context of Open Source Intelligence (OSINT), a sock puppet can be used to collect information without revealing the real identity of the collector. For example, a sock puppet can be used to infiltrate an online group, participate in discussions, ask questions, and gather information without arousing suspicion.
github.com/CScorza/OSINTAnonymous
osintcurio.us/2020/08/17/creating-research-..
osintteam.blog/create-sock-puppet-profile-f..
osintcurio.us/2022/05/17/corporate-osint-fo..
Secure Mailer
The encryption of emails is a method to protect the privacy and security of email messages by encoding them in such a way that only the intended recipient can read them. This is done using an encryption key that can be used to encode and decode the messages.
There are two main types of email encryption:
End-to-End Encryption (E2EE): This is the most secure type of email encryption. With E2EE, the message is encrypted on the sender's device and can only be decrypted on the recipient's device. This means that no one, not even your email provider, can read the message while it's in transit.
Transport Layer Encryption (TLE): In this type of encryption, the message is encrypted while it is being transmitted between the email server and the recipient's device. However, the message is readable by the email server, which means that the email provider or anyone with access to the server could potentially read your messages.
Advantages of email encryption include:
Privacy: Email encryption ensures your messages remain private and can only be read by the intended recipient.
Security: Email encryption protects your messages from being intercepted and read by malicious third parties.
Data Integrity: Email encryption can also help ensure the integrity of your messages, ensuring they haven't been altered in transit.
Authentication: Some email encryption systems also provide authentication, which means you can be sure the message really came from the person it says it came from.
There are several secure mail solutions available that prioritize encryption and privacy. Here are a few examples:
Startmail: StartMail is a privacy-focused email service known for its end-to-end encryption, user control over privacy settings, anonymous email options, and secure storage. It offers a user-friendly interface and operates on a subscription-based model.
Tutanota: A German-based email service that offers end-to-end encryption. Like ProtonMail, Tutanota has a free account tier and also offers premium tiers for additional storage and features.
Hushmail: This is a paid email service that offers encryption and added security features. It's been around for a long time and is popular in the healthcare industry because its services are compliant with the Health Insurance Portability and Accountability Act (HIPAA) in the United States.
Mailfence: Based in Belgium, Mailfence offers end-to-end encrypted email and has a strong commitment to privacy. They also provide digital signing as part of their service.
Zoho Mail: Zoho offers a suite of online productivity tools including a secure email solution. While it may not have the same privacy focus as some of the others on this list, it does provide SSL/TLS encryption and is compliant with several international security standards.
CounterMail: This is a Swedish email service with a strong focus on security and privacy, offering end-to-end encryption and a diskless server design for added security.
Fastmail: An Australian-based email service that does not use ads and offers several layers of security including two-step verification and secure SSL connections.
Encrypted Messaging Apps
Signal: Signal is a free, open-source messaging service developed by the Signal Foundation and Signal Messenger LLC. It uses end-to-end encryption to secure all communications to other Signal users. Signal can allow you to send text messages, voice messages, pictures, videos, files, and even make voice and video calls. Moreover, Signal doesn't store metadata and you can set messages to delete after a certain period of time, enhancing privacy.
Threema: Threema is a paid app that provides end-to-end encryption for messages, voice calls, photos, and even status updates. It's based in Switzerland, which has strong privacy laws, and it doesn't require a phone number to sign up, which can help protect your identity.
Session: Session is an open-source messaging application that is designed to protect your privacy. It doesn't require any sort of personal information (like a phone number or email) to create an account. Instead, it generates a Session ID that you can share with others. All messages sent over Session are end-to-end encrypted, and it uses onion routing for added privacy.
Wire: Wire is another open-source encrypted messaging app that provides end-to-end encryption for text messages, voice and video calls, and file sharing. It's based in Switzerland and complies with Swiss data protection laws. Wire offers a free version for personal use, as well as paid versions for businesses.
Wickr: Wickr is a secure, private, and compliant messaging platform that's trusted by world leaders, executives, journalists, human rights activists, and your friends.
Other Encrypted Messaging
Disk Encryption
Disk encryption is a technology that protects information by converting it into unreadable code that cannot be deciphered easily by unauthorized people. It uses disk encryption software or hardware to encrypt every bit of data that goes on a disk or disk volume.
Two types of disk encryption include:
Full Disk Encryption (FDE): This is a technique where everything on a hard drive is encrypted, including the operating system and all your files. This means that when the system is off, the data is secure. However, when you boot up the system and decrypt the data to use it, you're relying on other security measures to protect your data, such as OS-level permissions.
File-Level Encryption (FLE): This is where individual files or directories are encrypted by the file system itself. This can be more flexible than full disk encryption, as it allows you to only decrypt what you need to access, and the rest of your files remain encrypted and thus secure.
Techniques of Disk Encryption:
Symmetric Key Encryption: In this form of encryption, a single key is used to both encrypt and decrypt data. The security of symmetric key encryption is ensured by keeping the key a secret. Advanced Encryption Standard (AES) is a commonly used form of symmetric key encryption.
Asymmetric Key Encryption: Also known as public-key cryptography, it uses two keys – a public key and a private key. The public key is used to encrypt data, and the corresponding private key is used to decrypt it. This is considered more secure than symmetric key encryption but is also more resource-intensive. RSA (Rivest-Shamir-Adleman) is a widely used asymmetric encryption algorithm.
On-the-Fly Encryption (OTFE): This technique encrypts and decrypts files quickly as they are written or read from the disk. The encryption is transparent to the user and does not interfere with usage.
Some of the most popular disk encryption software includes:
BitLocker: A full disk encryption feature included with Windows.
FileVault 2: A disk encryption program available in Mac OS X 10.7 and later.
VeraCrypt: An open-source disk encryption software for Windows, Mac OS X and Linux.
LUKS: The standard for Linux hard disk encryption.
Hints:
On Linux hosts, it may be possible to obtain plausible deniability using different methods than those listed below, but this topic is a rabbit hole. Plausible deniability and full disk encryption (FDE) are also useless if physically coerced by the hijacker. A safer option is to leave no trace of detectable data on the personal computer. Whonix™ grub-live package provides amnesic functionality on Debian hosts and the Whonix™ virtual environment. When used exclusively within a virtual machine, it can provide adequate legal protection if several precautions are taken.
To protect against theft of information or personal data on the host, FDE should be used, and the computer should be turned off during high-risk situations such as travel. In the case of laptops, the battery should be temporarily removed after powering down. This ensures that RAM chips are completely deactivated and all encryption keys in memory are wiped. Hibernation is also a safe alternative, as the swap partition is encrypted in the default FDE setup for several platforms (e.g., Debian), provided that no changes have been made.
Additional
Removing the Luks Headers
Removing the LUKS header is a security measure that can be taken to ensure that data on an encrypted hard drive cannot be recovered. The LUKS header contains the necessary information to decrypt the disk, so by removing it, you effectively make the data inaccessible.
To remove the LUKS header from a disk, you can use the cryptsetup command in the Linux terminal. Replace /dev/sdXY with the encrypted partition. Respond YES to the prompt:
sudo cryptsetup luksErase /dev/sdXY
Alternatively, to achieve the same goal without prompting, run:
sudo dd if=/dev/zero of=/dev/sdXY bs=1M count=2
This will overwrite the first two megabytes of the /dev/sdXY partition, which should cover the entire LUKS encryption header for version 1. If you're using LUKS2 with cryptsetup version 2.1.0 (Debian Buster default), the default header size is now 16 MB. Earlier cryptsetup versions used a 4MiB LUKS2 header. In this case, just adjust the dd command: dd if=/dev/zero of=/dev/sdXY bs=1M count=16 (or count=4). Determine the header size using the command cryptsetup luksDump --debug <device>.
sleeplessbeastie.eu/2019/04/10/how-to-erase..
Nuke Patch for cryptsetup
The Nuke Patch for cryptsetup is a feature implemented by the Kali Linux distribution's penetration testing team. It adds an option to cryptsetup that allows all key slots to be erased upon entering a specific password, essentially rendering the encrypted data on the drive inaccessible, hence the name "nuke".
The concept behind this patch is that in a situation where someone is forced to reveal their encryption password, they could instead provide the "nuke" password. This would effectively delete all encryption keys, making the data on the hard drive unreadable.
Here's how to implement the Nuke Patch on cryptsetup:
First, you'd need to download and apply the Nuke Patch to your existing cryptsetup installation. This process may vary depending on your Linux distribution.
Once the patch is applied, you can create a new LUKS partition with a nuke password. During the LUKS partition setup, you'd enter a regular unlock password and a separate nuke password.
In the future, if you're forced to unlock your encrypted hard drive, you can enter the nuke password instead of the regular password. This will erase all key slots, making the data on the drive unreadable.
github.com/roema/cryptsetup-nuke
gitlab.com/kalilinux/packages/cryptsetup-nu..
Separate / boot partition
When using Full Disk Encryption (FDE) on a host, it's often recommended to keep the /boot partition separate from the rest of the encrypted system. This is because the /boot partition contains the initial boot loader and kernel image, which need to be accessible for the system to start up. However, if these files are stored unencrypted, they could potentially be tampered with, compromising the security of the rest of the system.
Here's how you might set up a separate /boot partition:
During the installation process of your Linux distribution, you'll usually have the option to manually partition your hard drive. Choose this option.
Create a small partition for /boot. The size depends on your distribution and how many kernel images you plan on keeping, but typically, 500MB to 1GB should be sufficient.
Set the rest of the disk (or the part you want to encrypt) as your root (/) partition. During the setup, choose to encrypt this partition.
The installer will set up the boot loader to unlock the encrypted root partition using a passphrase that you provide during boot.
Once the installation is complete, the /boot partition will remain unencrypted, and the rest of the system will be encrypted.
Remember that an attacker with physical access to the system could still potentially tamper with the /boot partition. Some users choose to mitigate this risk by storing the /boot partition on a USB stick that they can keep separate from the computer when not in use.
TRESOR Kernel Patch
The TRESOR Kernel Patch is a Linux security feature that is used to mitigate the risk of cold boot attacks, which involve an attacker obtaining encryption keys from a machine's RAM.
Traditional full-disk encryption systems store the encryption keys in RAM while the system is running. This exposes the keys to potential threats, since RAM can be read by any process with administrative privileges, and the data in RAM can also persist for a short period of time even after power loss, making it possible to physically extract the keys.
TRESOR aims to solve this problem by storing the encryption keys inside the CPU, specifically in the debug registers used by the CPU's built-in debugging facilities. This makes the keys much more difficult to access, and they are also immediately lost when the system is powered down, preventing cold boot attacks.
However, there are some limitations to TRESOR:
It only works on certain CPUs. The CPU must have support for the AES-NI instruction set and the x86 architecture.
It disables software debugging facilities, as it uses the debug registers to store the encryption keys.
It's not a part of the standard Linux kernel, so it has to be patched in. This can make system updates more complex.
It may not protect against attackers with physical access to the machine who can use hardware attacks to read the CPU registers directly.
cs1.tf.fau.de/research/system-security-grou..
USB Killer
I made a Post about that, it's very easy to create one. You can read it here!
Clear hard disk table and sectors
If you want to completely clear your hard disk drive, meaning that you want to erase all the data on it, you can do this with the dd command in Linux. This command will overwrite all data on your hard drive with zeros, making it very difficult (but not impossible) to recover any data.
Before proceeding, please be aware that this will permanently delete all data on the drive. Make sure you have backed up any important data before you do this.
Here is the command:
sudo dd if=/dev/zero of=/dev/sdX bs=4096
Replace sdX with the correct identifier for your hard drive. For example, it might be sda for the first hard drive. You can check the identifiers for your drives with the lsblk or fdisk -l command.
The dd command works as follows:
if=/dev/zero specifies the input file. In this case, it's /dev/zero, a special file that produces null bytes when read.
of=/dev/sdX specifies the output file. This should be your hard drive.
bs=4096 specifies the block size. This is set to 4096 bytes, or 4 KiB, which is a common block size for many modern hard drives.
Please note that this operation can take a long time, depending on the size and speed of your hard drive.
After running this command, your hard drive will be completely empty, and you will need to create a new file system on it before you can use it again.
If you want to make the data even harder to recover, you could overwrite the drive with random data instead of zeros. To do this, you can use /dev/urandom as the input file:
sudo dd if=/dev/urandom of=/dev/sdX bs=4096
This will take much longer than overwriting with zeros, but it provides a higher level of security.
Data destruction by Mr. Robot (No recommended)
Elliot drilled holes in the hard drives to expose the platters to air and dust. The metal shavings would have also scratched the surface of the platters and the holes themselves would have either prevented the platters from spinning altogether or would have screwed up the read/write head if anyone tried to recover the data. Personally, when I destroy a hard drive, I prefer to go over each side of the platters with a belt sander just to be sure. But when in a pinch, drilling holes is probably good enough. Even just removing the cover would make data recovery very difficult.
For the motherboards, he removed the DRAM, BIOS ROM, and CMOS RAM chips, which may have contained identifying information. Crushing them would have probably done the trick, but throwing them in the microwave was faster. He did the same for his MicroSD and SIM cards.
The rest of the PC he just threw in the trash, which again, is fine in a pinch. But a lot of the other chips on the motherboard and hard drive controller could have contained persistent writable memory and should have been destroyed, as well. But maybe he did that and we just didn't see
reddit.com/r/MrRobot/comments/44lyuj/method..
Don't do this at home, I recommend looking at reddit above for more details and there are better methods with electrical discharges and such
General OpSec Techniques
Operational Security (OpSec) techniques for maintaining anonymity often involve obscuring your identity, encrypting your communications, and using secure systems. Here are ten such techniques and example tools:
Anonymity Networks: Tools such as the Tor network can be used to anonymize your online activity. Tor helps to protect your privacy by bouncing your communications around a distributed network of relays run by volunteers all around the world.
Virtual Private Networks (VPNs): VPNs such as NordVPN or ExpressVPN can be used to create a secure, encrypted connection, effectively hiding your IP address and protecting your online identity.
Secure and Private Browsers: Browsers like Tor Browser or Brave provide features that prevent tracking and help maintain user anonymity.
Secure Email Services: Use email providers that emphasize privacy and security, like ProtonMail or Tutanota.
Secure Messaging Apps: Applications like Signal or Wire offer encrypted messaging services, ensuring that only you and the person you're communicating with can read what is sent.
Anonymous Payment Methods: Cryptocurrencies like Bitcoin, Monero, or Zcash can be used for anonymous transactions. Prepaid gift cards can also offer a degree of anonymity.
Privacy-focused Search Engines: Rather than using a search engine that tracks your activity, use one that respects your privacy like DuckDuckGo or Startpage.
Data Encryption Tools: Tools like VeraCrypt can be used to encrypt your data, preventing unauthorized access.
Disposable Virtual Machines: Tools like Tails, a live operating system that you can start on almost any computer from a USB stick or a DVD, leaves no trace unless you explicitly ask it to.
Pseudonyms: Use pseudonyms when possible to avoid using your real name online, which can be tied back to your identity. Be consistent in using these across services to maintain your alter ego.
Anti-Forensic and Hardware Solutions
github.com/shadawck/awesome-anti-forensic
pwnieexpres.com/collections/all
Conclusion
Anti-forensics, anonymity and opsec methods go far beyond what has been shown, whether you use alternate phone numbers, wipe metadata from files and photos, use encrypted USB drives and others without write permission read-only to store information, in addition to being encrypted. Use P2P forms of communication or that use cryptographic keys and secure communication tunnel. Using OSINT techniques to map your tracks on the internet, famous digital footprinting and even investing in equipment. That's why it requires expenses and costs that depending on your reality, it's better to do the minimum. Being a Black Hat is not something simple as shown in the movies, you can take half of what I've shown here and use it in your day to day as a Red Teamer and White Hat to carry out campaigns and test your internal team.
Another thing is the way you make monetary transactions, verify currencies that use more sophisticated security technologies and that make it difficult to track and detect abuse.
Also, other unspoken methods are encryption and the techniques of hiding a file or message in a photo, audio and even inside another file. Example:
youtube.com/watch?v=teShYhts2So&ab_chan..
medium.com/analytics-vidhya/get-secret-mess..
youtube.com/watch?v=EVsx0pE8uPI&ab_chan..
youtube.com/watch?v=TWEXCYQKyDc&ab_chan..
youtube.com/watch?v=2sKENpzPt6w&ab_chan..
youtube.com/watch?v=BQPkRlbVFEs&ab_chan..